Navigating the Timesheets interface
RevasOS Timesheets has several views, each designed for a specific part of your time-tracking workflow. This guide walks you through every view in the application so you know where to go and what you can do.
Before you begin:
To use the Timesheets app you need at least the Timesheet user permission. Some views and actions described below are only available to users with the Timesheet and Attendance Manager permission. For more details, see roles and permissions.
Dashboard
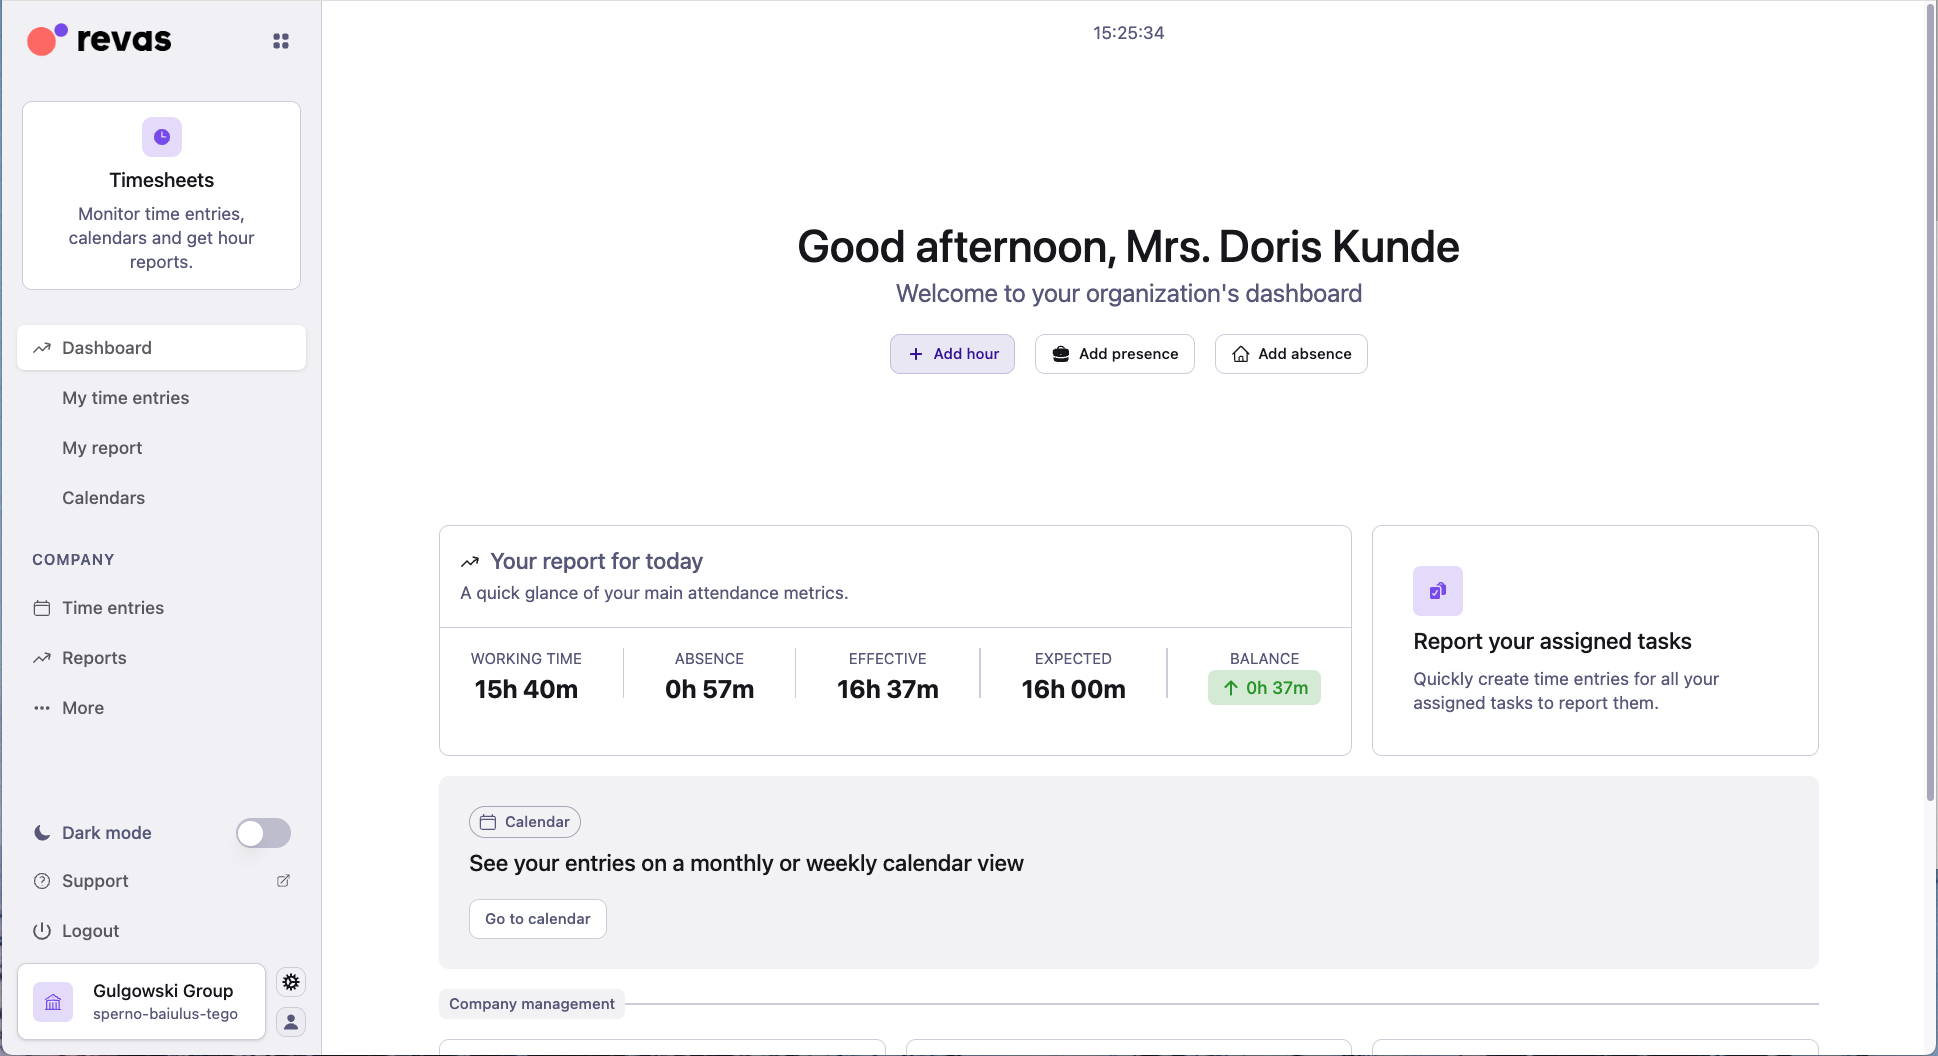
The Dashboard is the first screen you see when you open the Timesheets app. It gives you a personalized snapshot of your day and quick access to every other part of the application.
What you will find
- Live clock and greeting — the dashboard shows the current time and a time-aware greeting (Good morning, Good afternoon, or Good evening).
- Quick-action buttons — three buttons let you immediately start logging time:
- Add hour — create a standard time entry.
- Add presence — record physical attendance at a workplace.
- Add absence — register leave, a holiday, or a sick day.
- Today's report card — a summary card showing your working time, absence time, effective hours, expected hours, and balance for the current day.
- Navigation cards — tiles that link to the other main areas of the app: Calendar, Task Reporting, Company Management, Settings, Learning Resources, and Mobile App.
Note:
The dashboard is role-aware. Administrators see additional links such as Company Management and organization-wide settings, while employees see their personal tools.
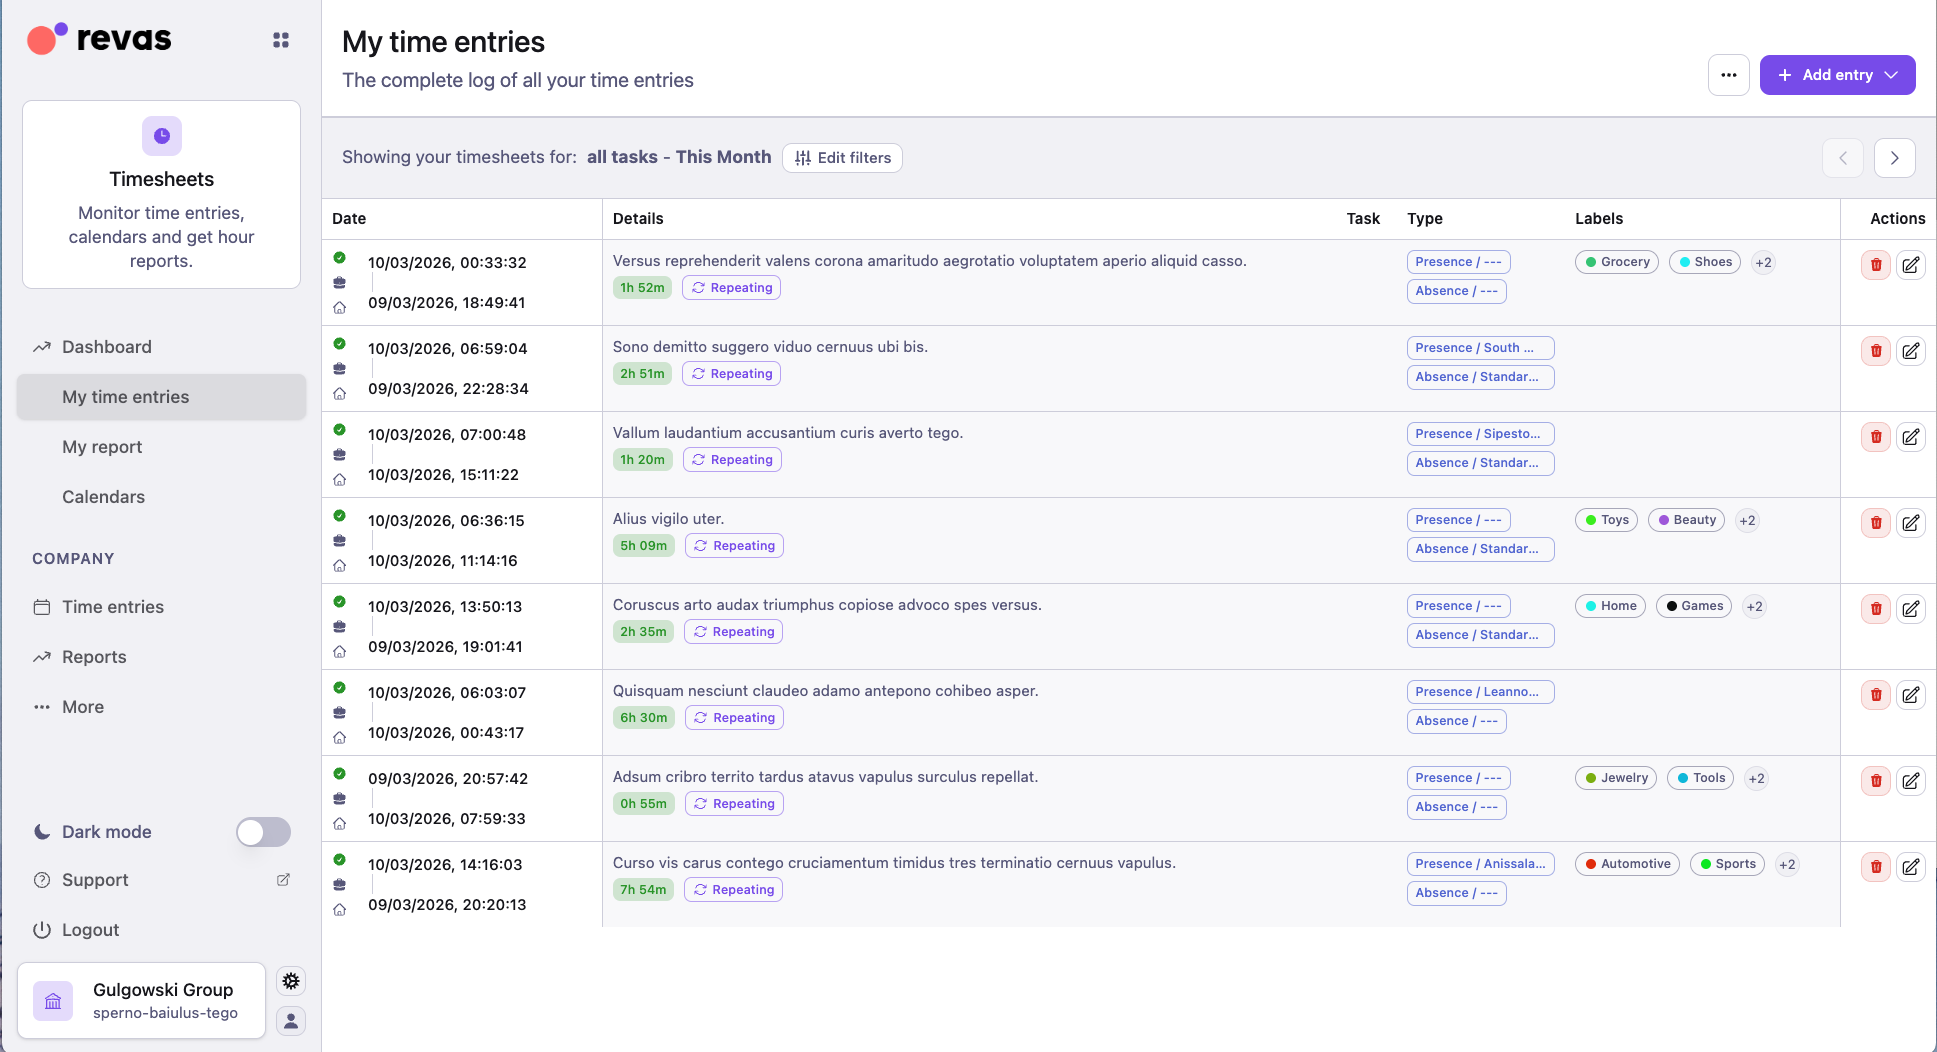
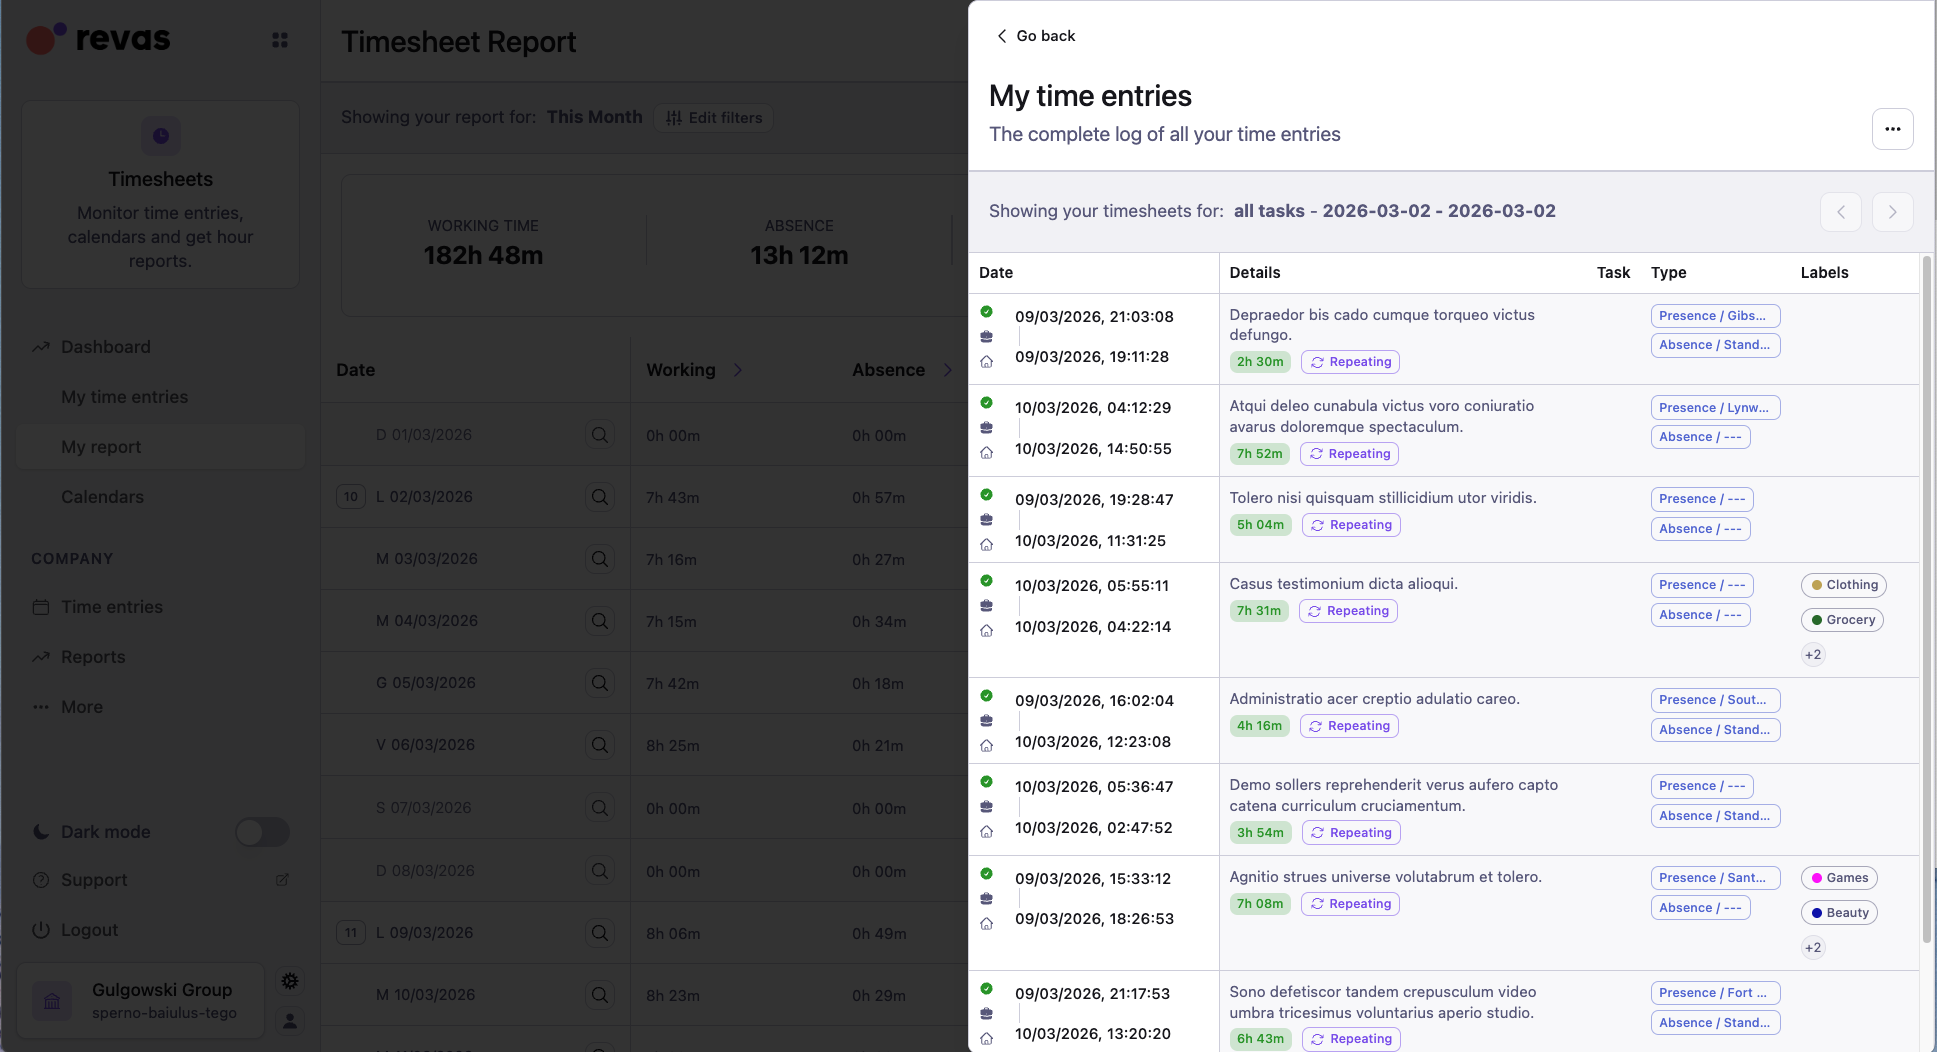
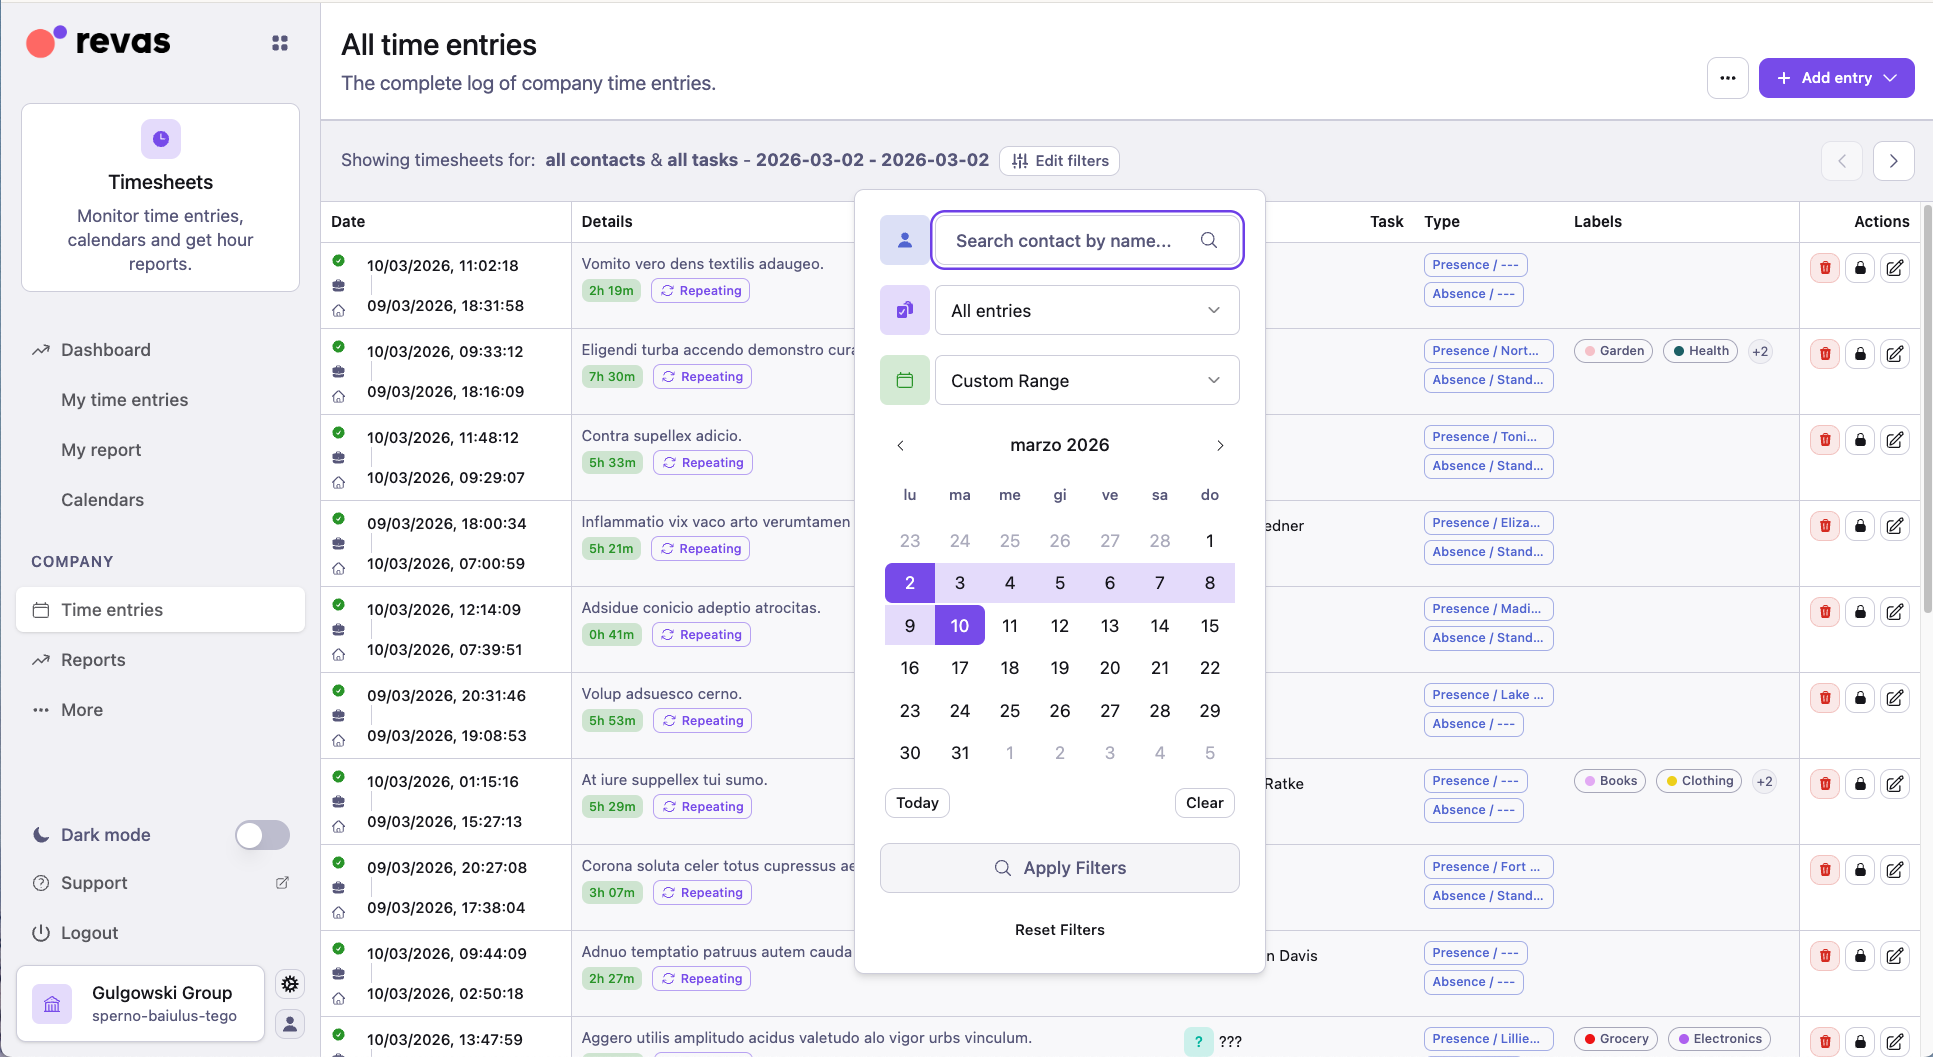
My time entries
My time entries is a list-based view of all your time entries. It is the primary place to browse, filter, and manage your recorded hours, presences, and absences.
What you will find
Each row in the list represents a single time entry and shows:
- Description — what the entry is about.
- Start date and time and End date and time.
- Duration — total hours for the entry.
- Workplace (for presences) or Absence type (for absences).
- Task and project — if the entry is linked to a task.
- Labels — color-coded tags assigned to the entry.
- Lock icon — visible when the entry has been locked by an administrator.
- Action buttons — each row has buttons at the end to:
- Lock / Unlock the entry.
- Delete the single entry, or bulk-delete all entries created together in a batch.
- Split — open the split time entry editor to divide the entry across tasks.
Unreported time entries (entries not linked to any task) are displayed first.
A Report section appears at the top of the list showing the main metrics as large numbers: Effective hours, Balance, Working hours, and Absence hours. Each row in the report lets you expand a specific day to see the time entries recorded for that day.
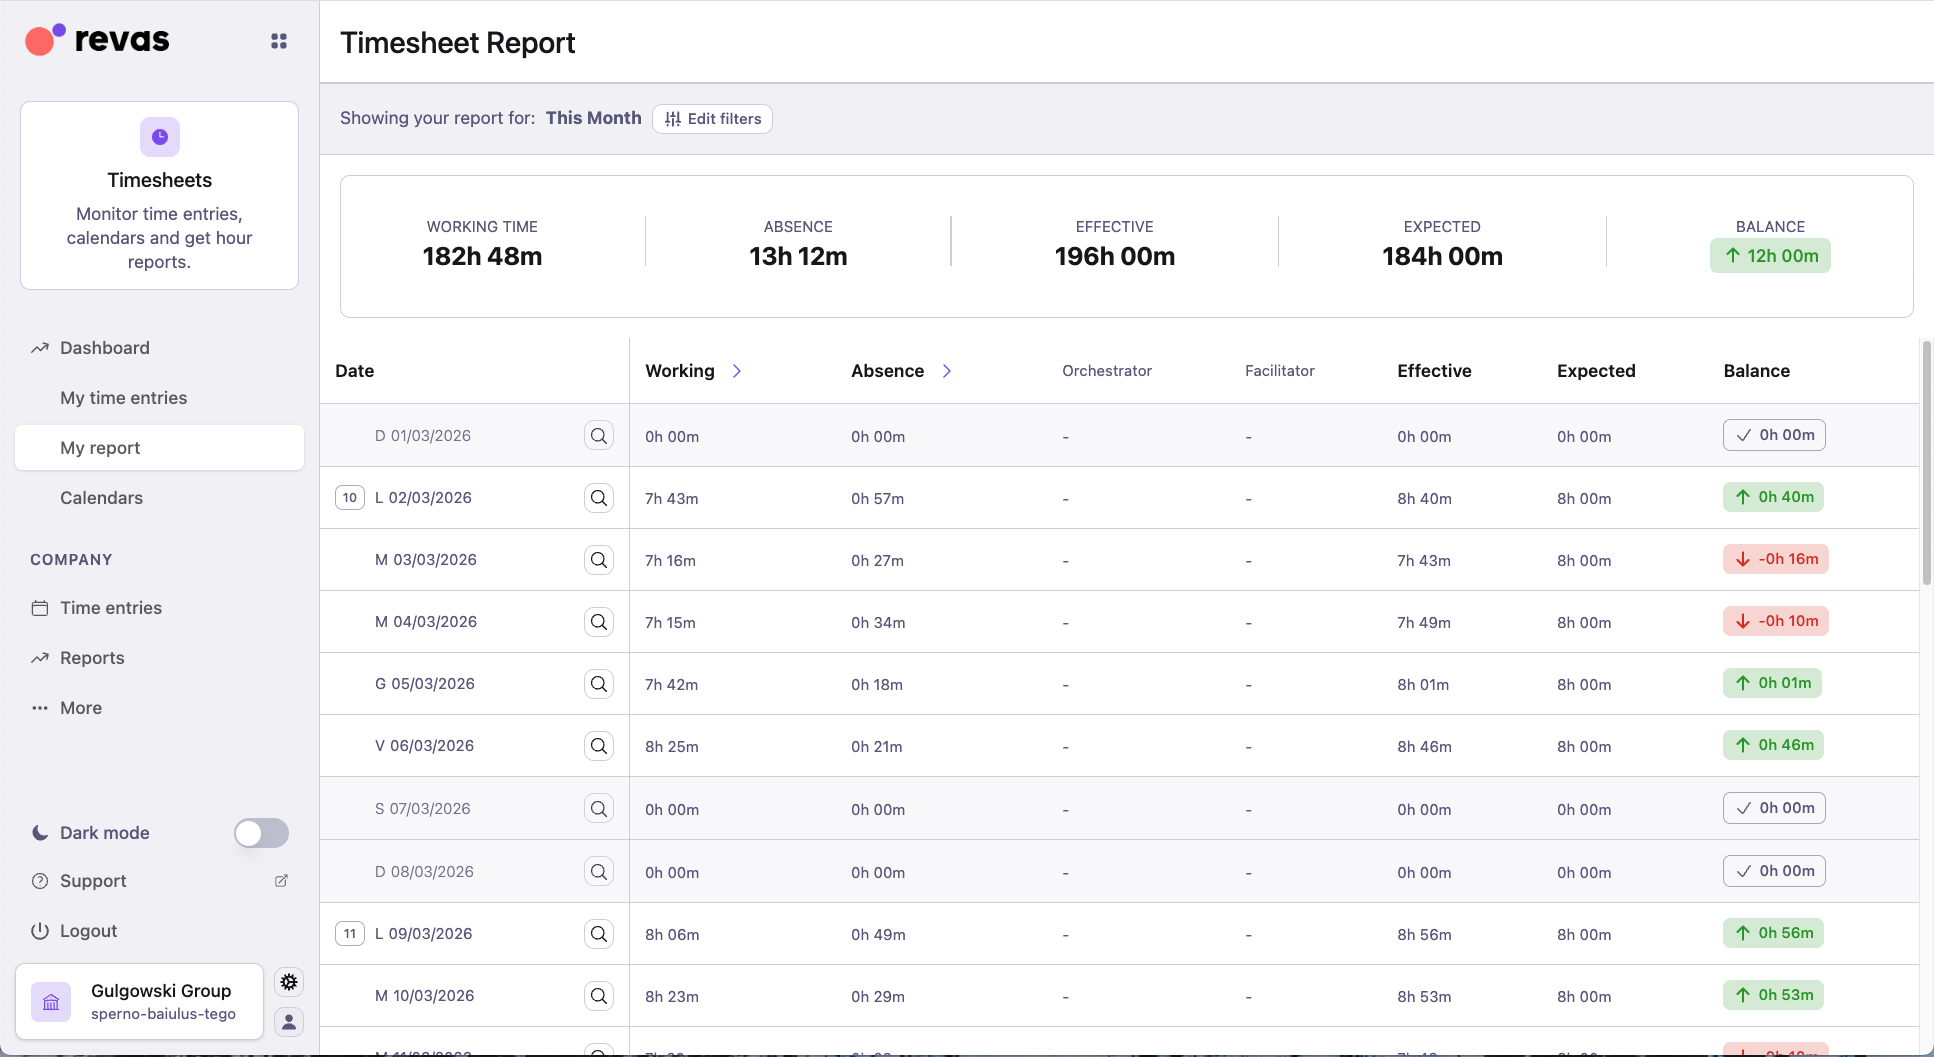
Click the search icon on any day row to see the individual time entries recorded for that date.
Filtering
By default the list shows the current month. You can narrow or expand the data:
- Date range — set the From and To fields and click Filter.
- Quick filters — choose This month, This week, Last month, or Last week.
- View mode — toggle between All (all entries including reported and unreported) and your default view.
- Contact (admin only) — search for a specific employee to view their entries.
Actions you can take
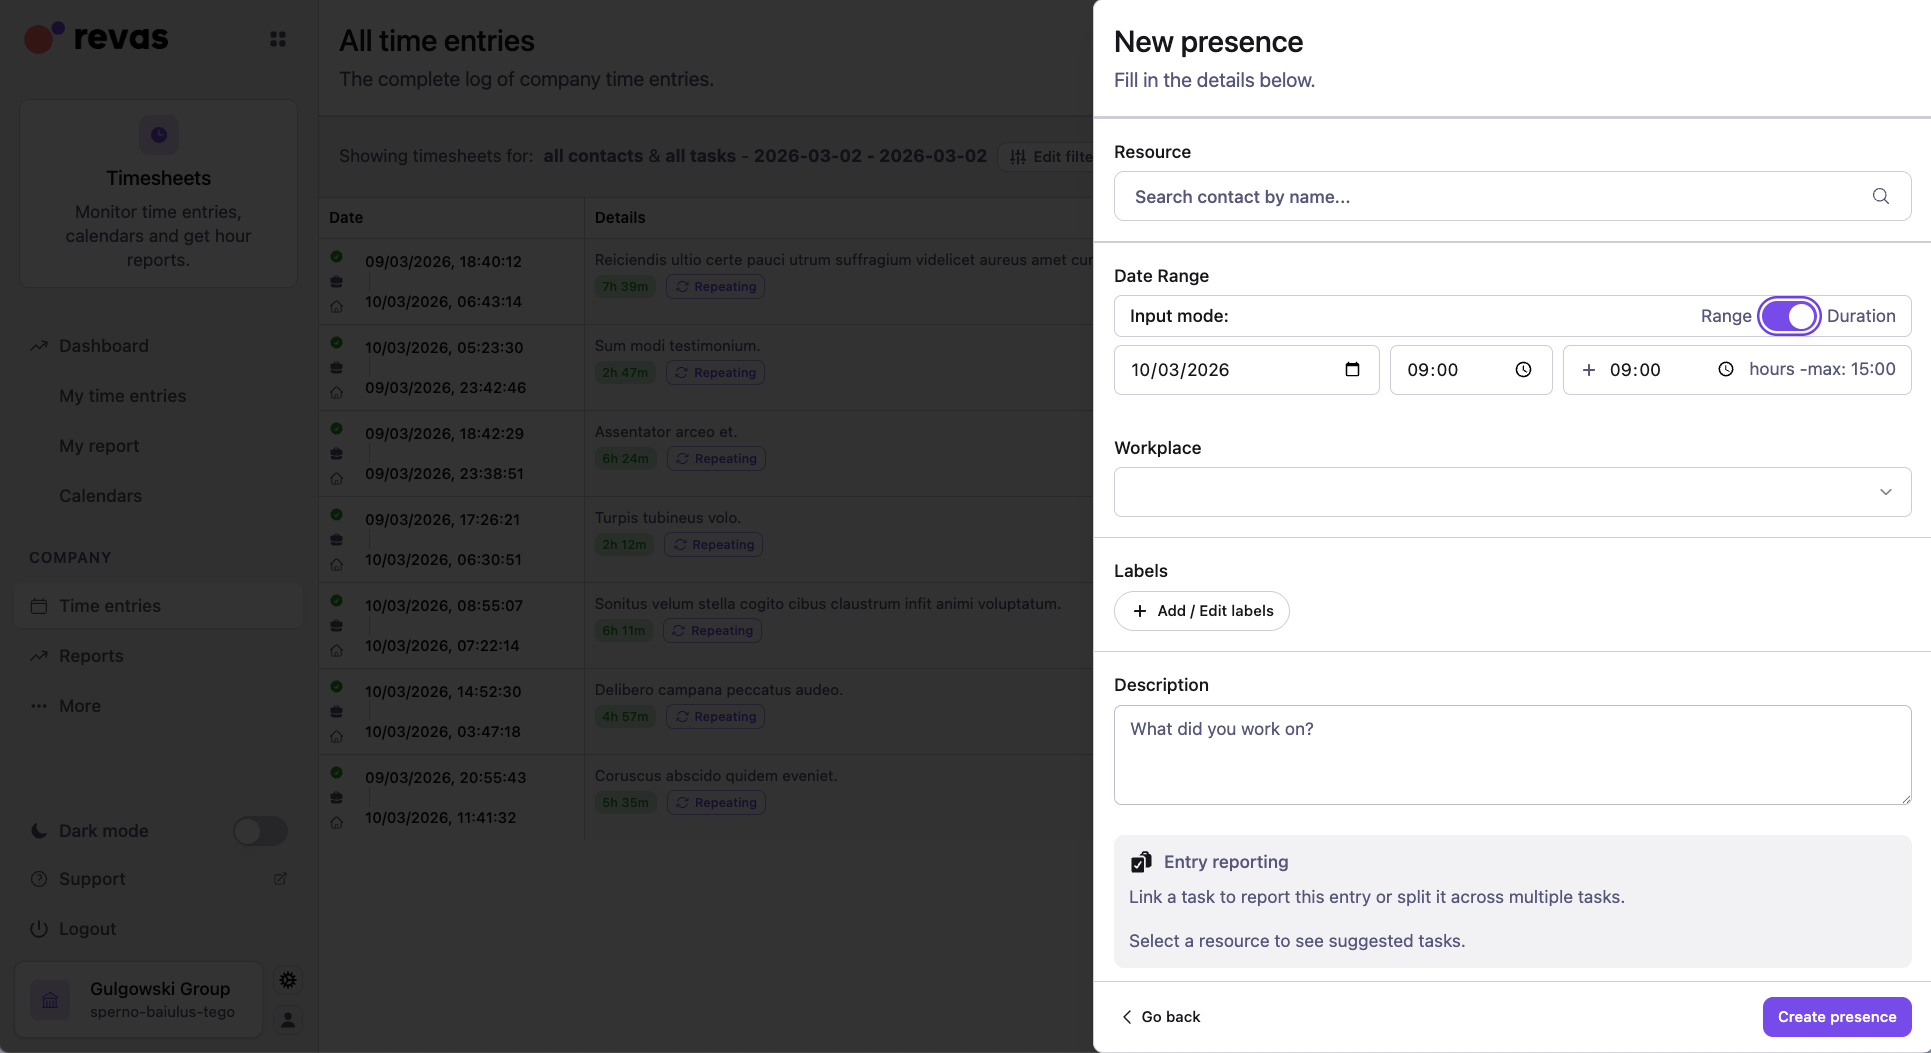
- Click the + Add button to open a panel with the following options:
- Add presence — record attendance at a workplace.
- Add absence — register leave or a non-working period.
- Add hour — create a simple time entry with no leave profile or workplace.
- Add multiple time entries — go to the batch creation view.
- Quick report tasks — go to the quick reporting view.
- Click any entry to open its detail view and edit it.
- Use the Export button to download time entries. When viewing entries filtered by a specific task or project, the export contains only the entries for that task or project.
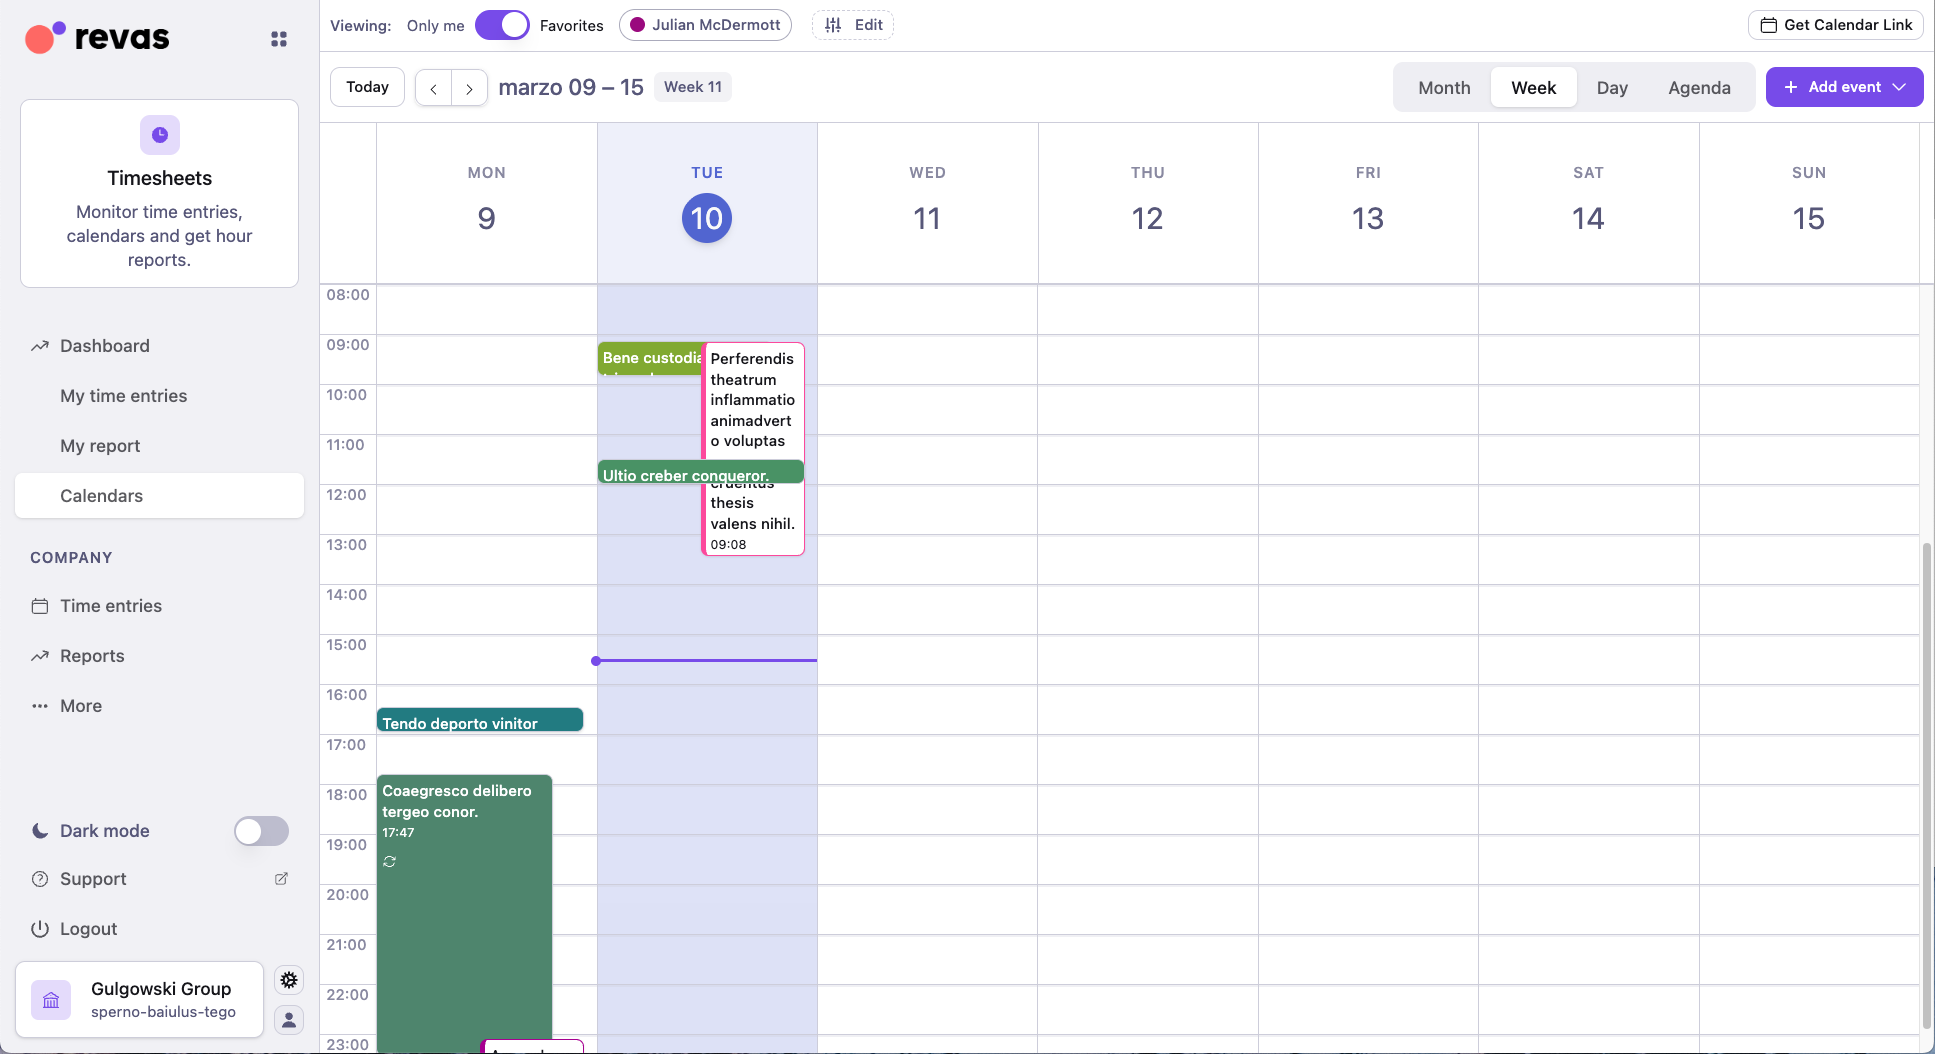
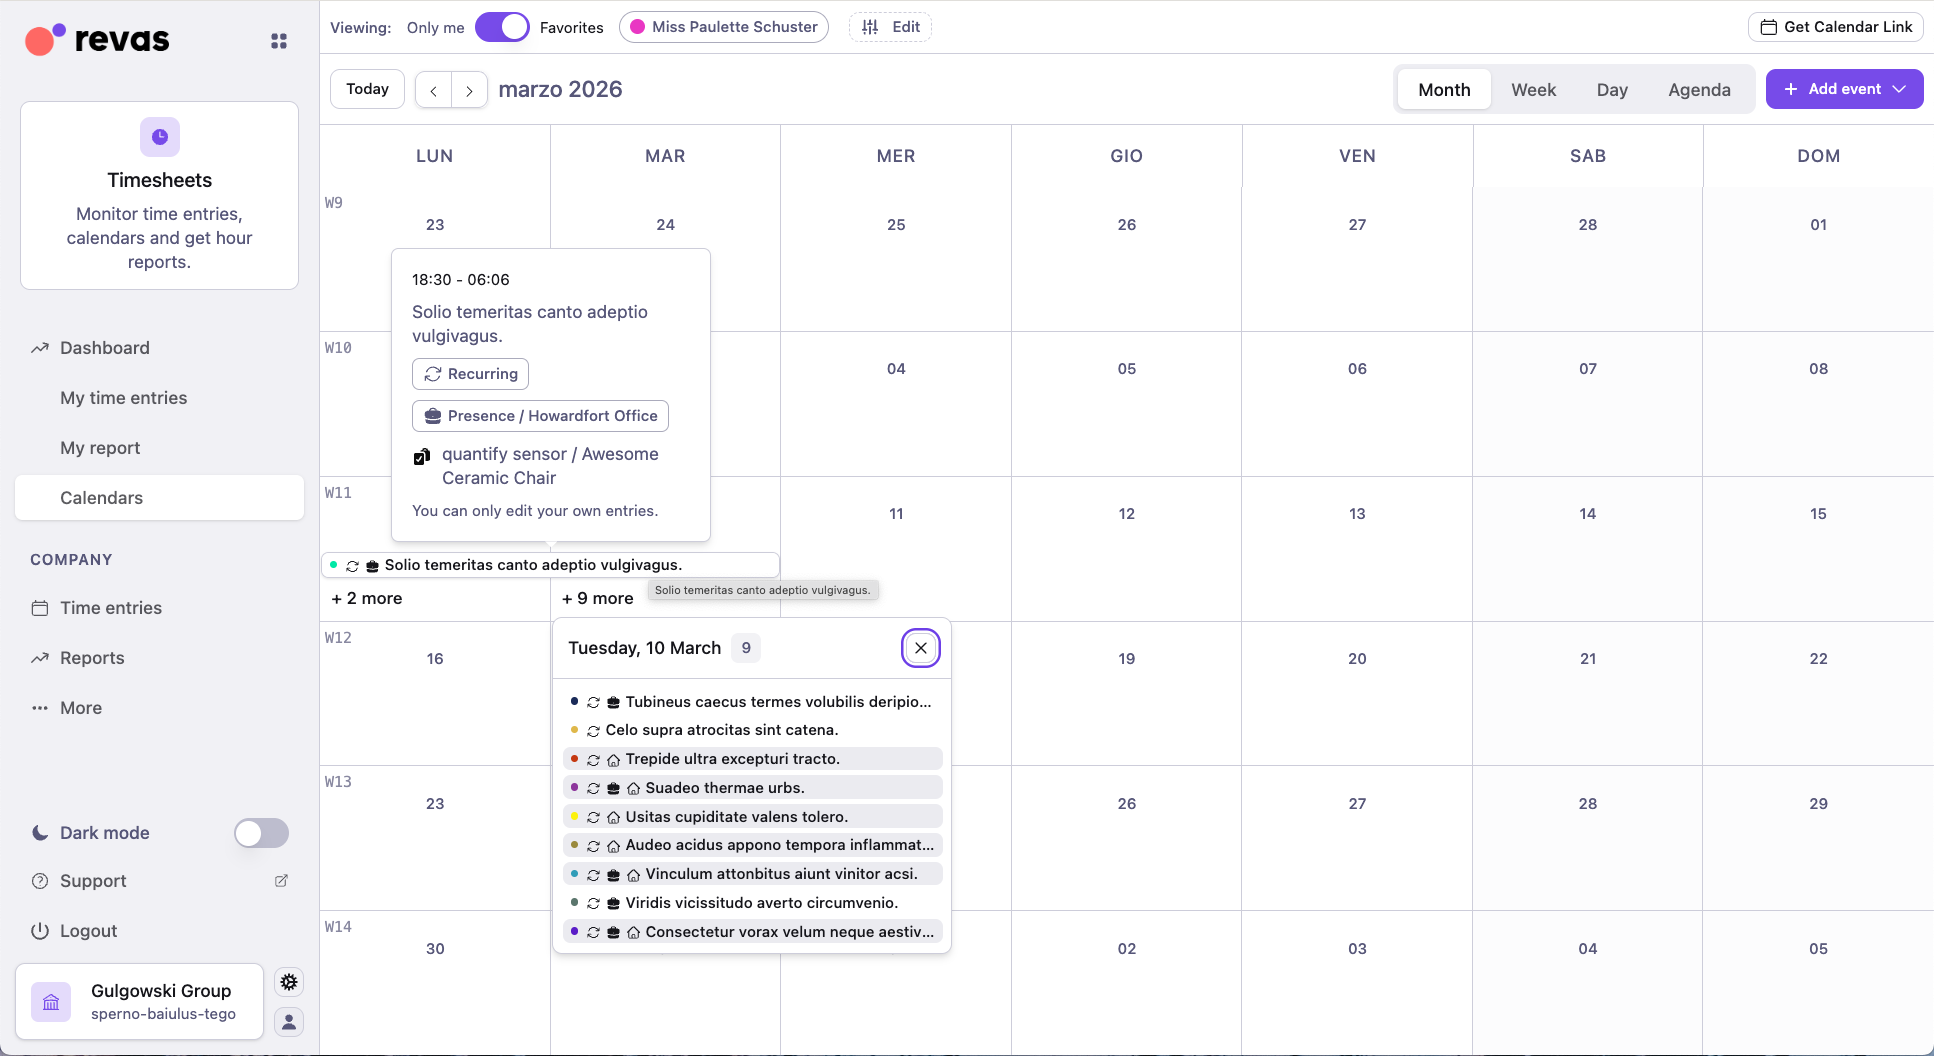
Calendar
The Calendar view displays your time entries as color-coded events on a visual calendar. It is ideal for seeing your schedule at a glance and spotting gaps or overlaps.
What you will find
- Color-coded events — entries are colored by type (hour, presence, absence) and by contact when viewing multiple calendars.
- Hover cards — hover over an event to see its time range, description, labels, task, project, and workplace without opening it.
- Multi-contact view — administrators and managers can overlay multiple employees' calendars to review team availability.
In the Month view, click a day to expand a popover listing all entries for that date. Hover over an event to see its details.
The Agenda view displays entries as a chronological list, making it easy to scan through events across multiple days.
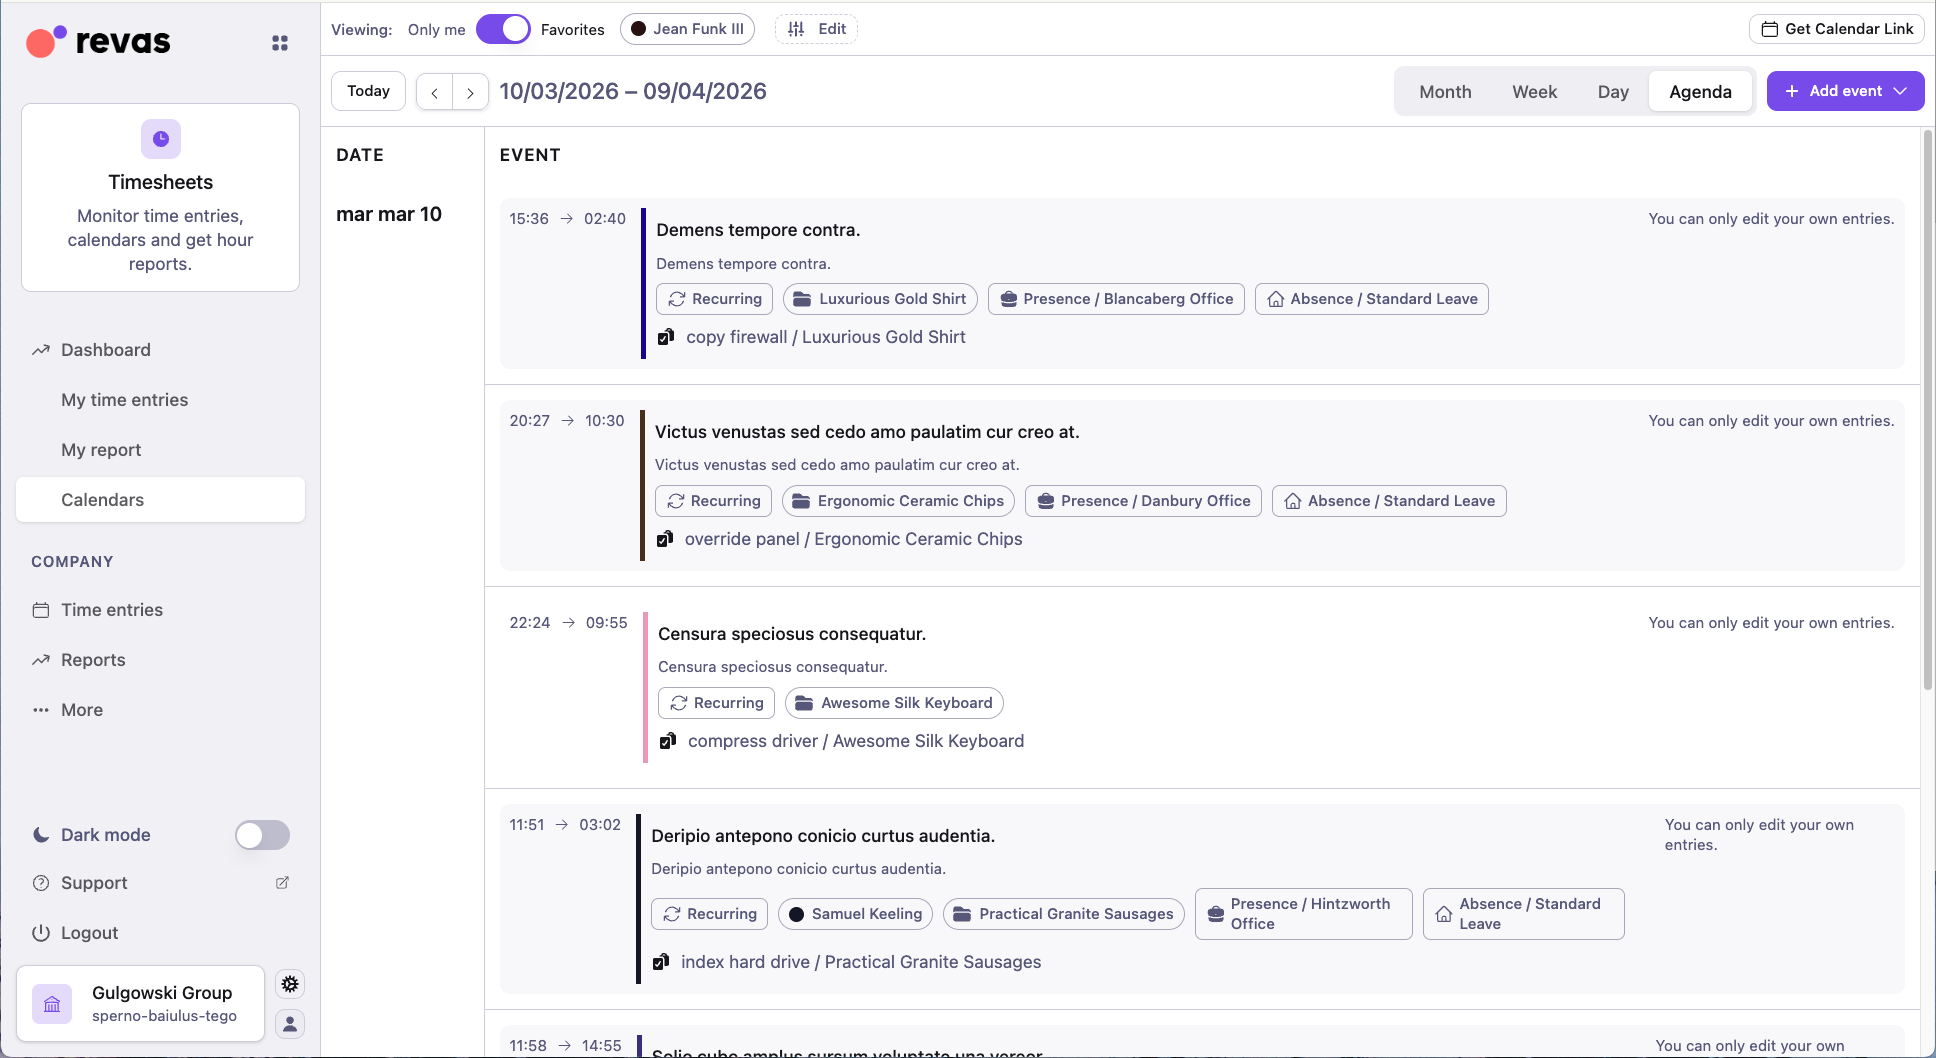
Changing the time frame
- On desktop, switch between Day, Week, Working week, and Month using the buttons at the top. Use Previous and Next to navigate.
- On mobile, tap the start and end dates to select a preset (Today, Tomorrow, This week, Next week) or enter custom dates.
Adding other calendars
To view other collaborators' calendars:
- Toggle the switch at the top of the calendar to enable the multi-contact view.
- Search for the collaborators you want to add.
- Click Save to confirm your selection.
On mobile, tap Favorites to see the collaborators you saved via desktop, or tap All to browse every collaborator.
Actions you can take
- Click or tap an empty slot to create a new entry directly on the calendar.
- Click an event to open its detail view, where you can edit, lock, delete, or report it.
- Generate an iCal subscription link to sync your Timesheets calendar with external calendar apps.
Create batch time entries
The Create batch time entries view lets you create many time entries at once. It is useful when you need to report a series of recurring shifts, fill in holiday days, or set up a fixed schedule for a defined period.
How it works
- Open the creation form from My time entries (click + Add and choose an entry type) or from the Calendar (click an empty slot). You can also select Add multiple time entries directly from the + Add panel.
- In the creation form, click Do you want to enter several times at once? Click here below the End date field.
- Fill in the details for the first entry: date, total hours (HH:MM:SS format), and optionally a description, linked task, workplace, or absence type. To enter precise start and end times, enable the Enter precise start and end hours toggle.
- Select the Repeat mode — choose Weekly or Monthly, pick the days of the week, and set a Repetition end date.
- Review the summary carefully, then click Continue and Confirm and Create.

Important
This screen can create many entries in one batch. Once created, any errors must be corrected one entry at a time. Double-check all fields before confirming.
Note:
A maximum of 52 time entries can be created at one time. Only users with the Timesheet and Attendance Manager permission can create batch entries for other employees.
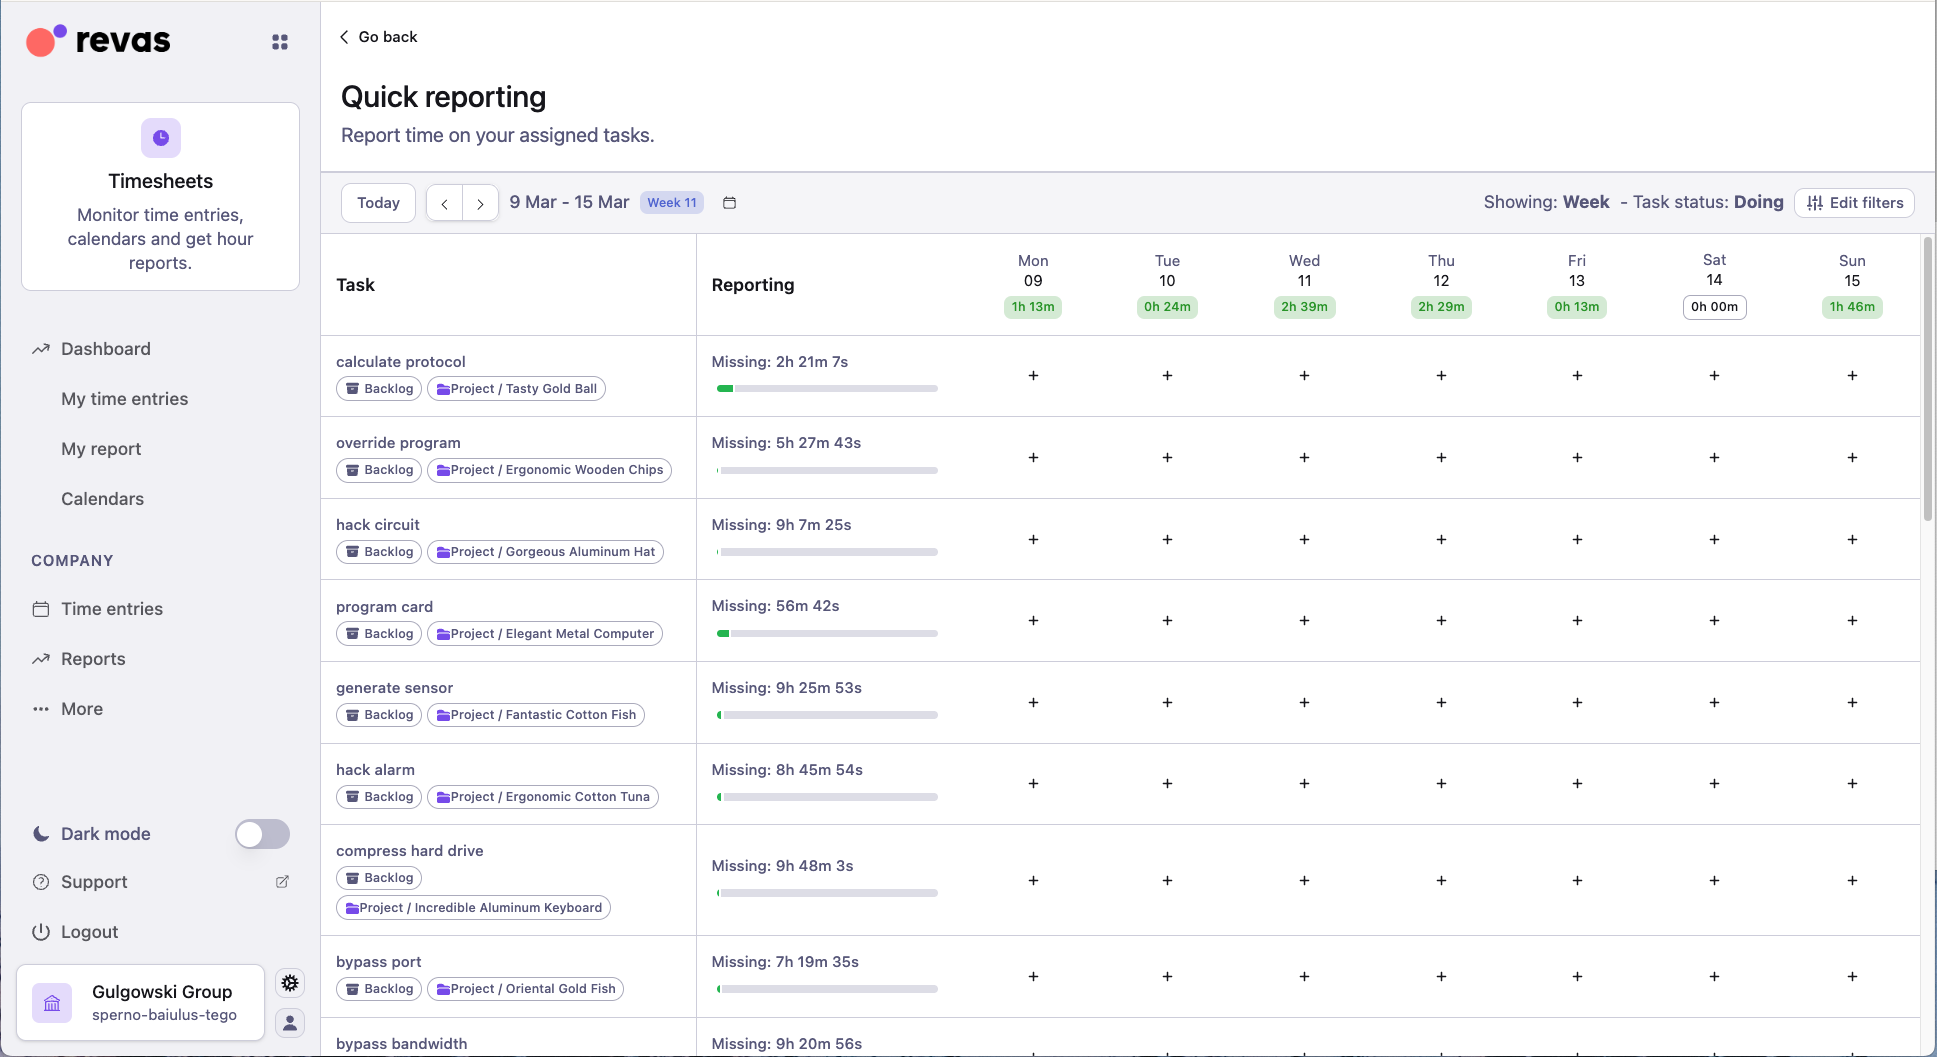
Quick report tasks
The Quick report tasks view is where you connect time tracking to project management. It organizes your tasks day by day (or week by week) so you can log and review time at a glance.
What you will find
- Day-by-day layout — tasks are displayed for each day (or grouped by week). For every day you can add new time entries and see the time entry report for that single day.
- Daily report badge — each day shows a badge that, when clicked, reveals the time entries already recorded for that day.
- Add time to a task — click a task on any day to log time directly against it. You can also assign a task to an already existing entry, or split a portion of an existing entry onto the task.
- Task report per row — each task row shows a time-based report with Estimated time, Actual reported time, Missing time, and Exceeding time.
When you click the + button on a specific day, a dialog opens where you can create a time entry linked to that task. You can choose to create a new entry from scratch or select from existing entries.
Note:
The per-task time report is only visible when the task has an estimated duration and you have the permission to view schedules.
Filtering
- Task state — filter by To Do, Doing, or Done.
- Contact — see tasks for a specific employee.
- Date range — narrow results to a specific period.
- View mode — toggle between All (organization-wide) and Self (your own tasks only).
Guides
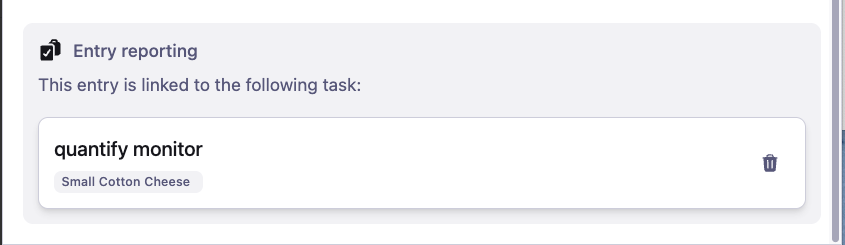
Split time entry
The Split time entry view lets you divide a single time entry across multiple tasks. This is useful when one block of work spans several projects or activities and you need each portion tracked separately.
What you will find
- Time entry card — at the top, a card displays the details of the entry you are splitting (description, date, total duration).
- Task list — below the card, a list of available tasks is shown. Each task displays its project name, a task time report (estimated time, actual reported time, missing time, exceeding time), and an input field where you enter the hours to allocate.
- Available time indicator — at the bottom, a counter shows how much time from the original entry is still available to assign. If the total hours you allocate across tasks exceeds the original entry's duration, saving is disabled.
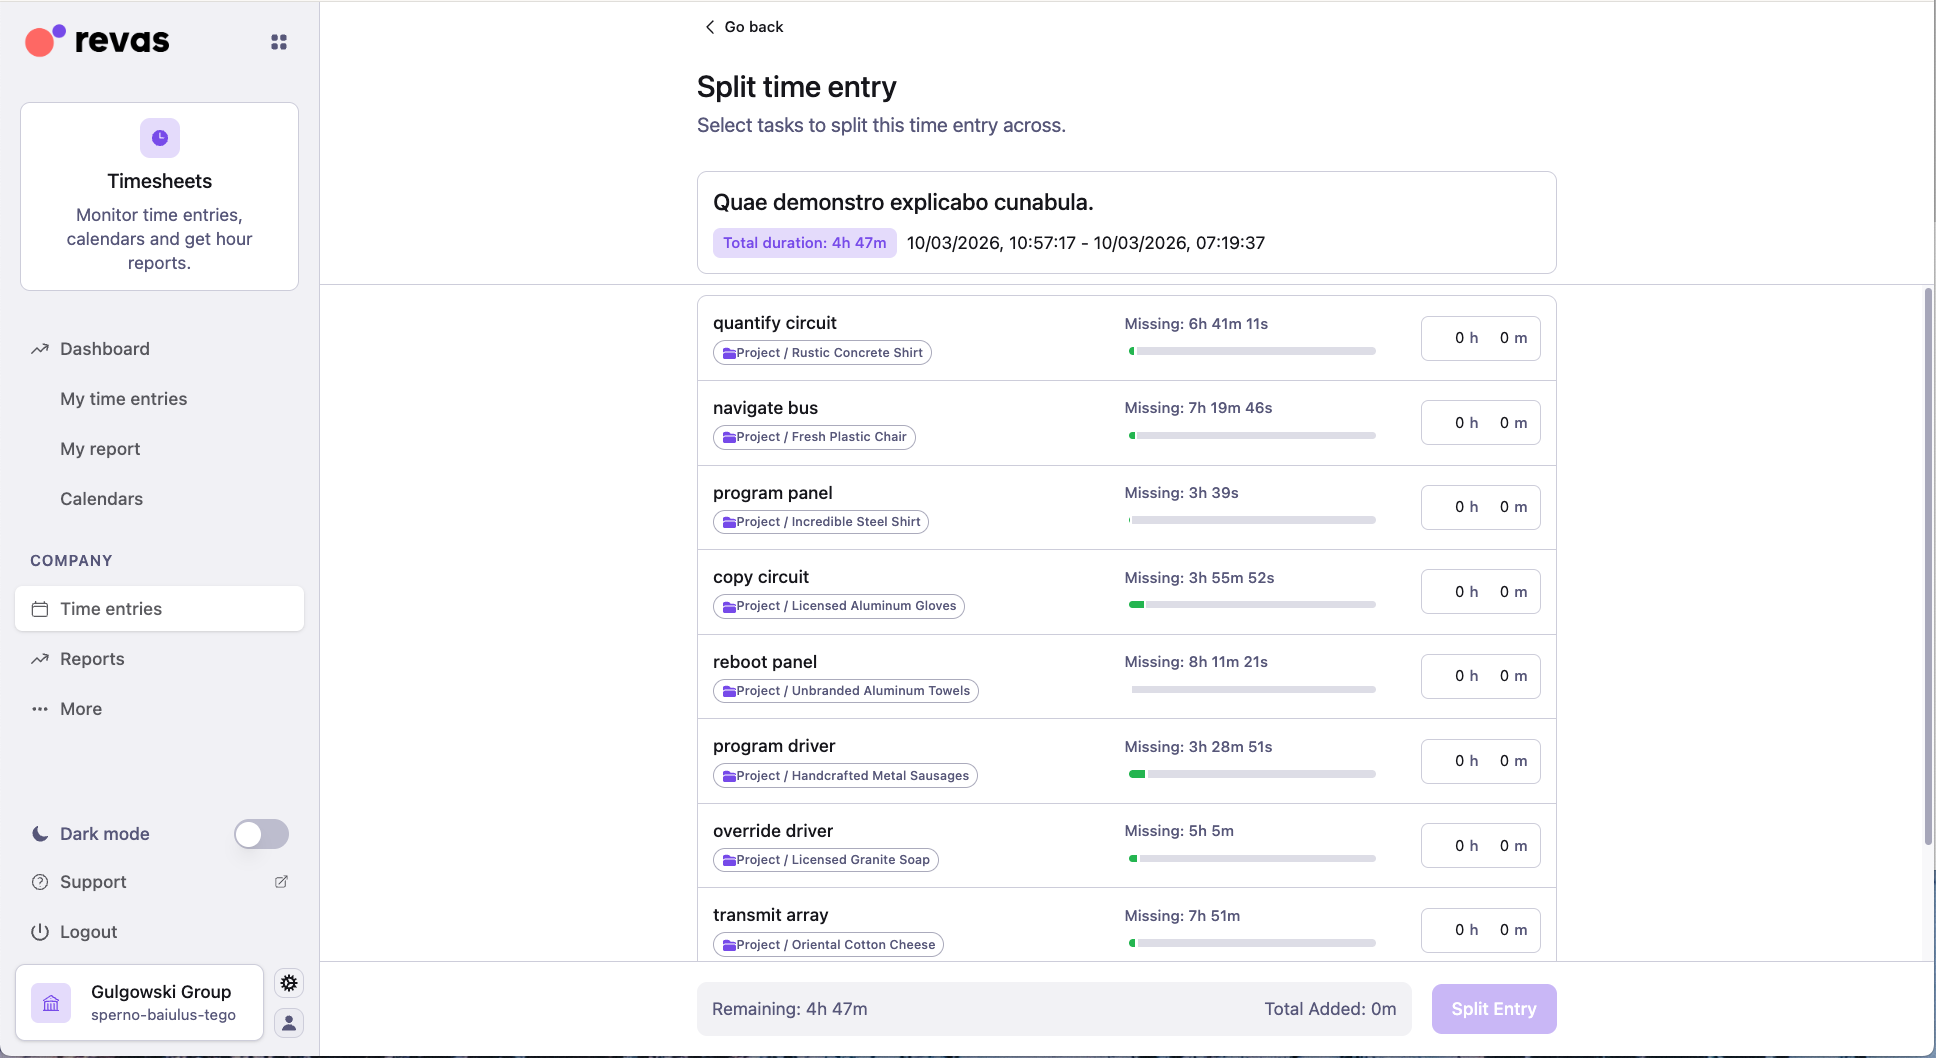
How it works
- Open the time entry you want to split.
- Select Split from the entry actions.
- Find the tasks you want to allocate time to and enter the hours for each one.
- Check the available time indicator to make sure you have not exceeded the total duration.
- Click Save. A confirmation summary appears showing the selected tasks and their allocated times, previewing the entries that will be created.
- Review the summary and confirm to create the individual sub-entries.
The original entry is replaced by the new sub-entries, each linked to its respective task. Entries created through this operation are recognized by the system as a batch, so you can bulk-delete them later from the time entries list.
Guides
Edit time entry
The Edit time entry view opens when you click on any entry from the My time entries list or the Calendar. It is the detail panel for a single time entry.
What you can do
- Edit description — update what the entry is about.
- Change date and time — modify the start and end timestamps.
- Change workplace or absence type — reassign the location or leave profile.
- Link or change a task — associate the entry with a task for reporting.
- Add or remove labels — apply color-coded tags to categorize the entry.
- Report — perform simple or advanced reporting.
- Lock / Unlock (admin only) — prevent or allow further edits. Locked entries display a lock icon.
- Delete — remove the entry entirely.
Locked time entries
A locked time entry cannot be edited. Only users with the Timesheet and Attendance Manager permission can lock and unlock entries. Look for the lock icon to identify locked entries.
Settings
The Settings view is where administrators configure how the Timesheets app behaves across the organization. Employees can also access personal settings here.
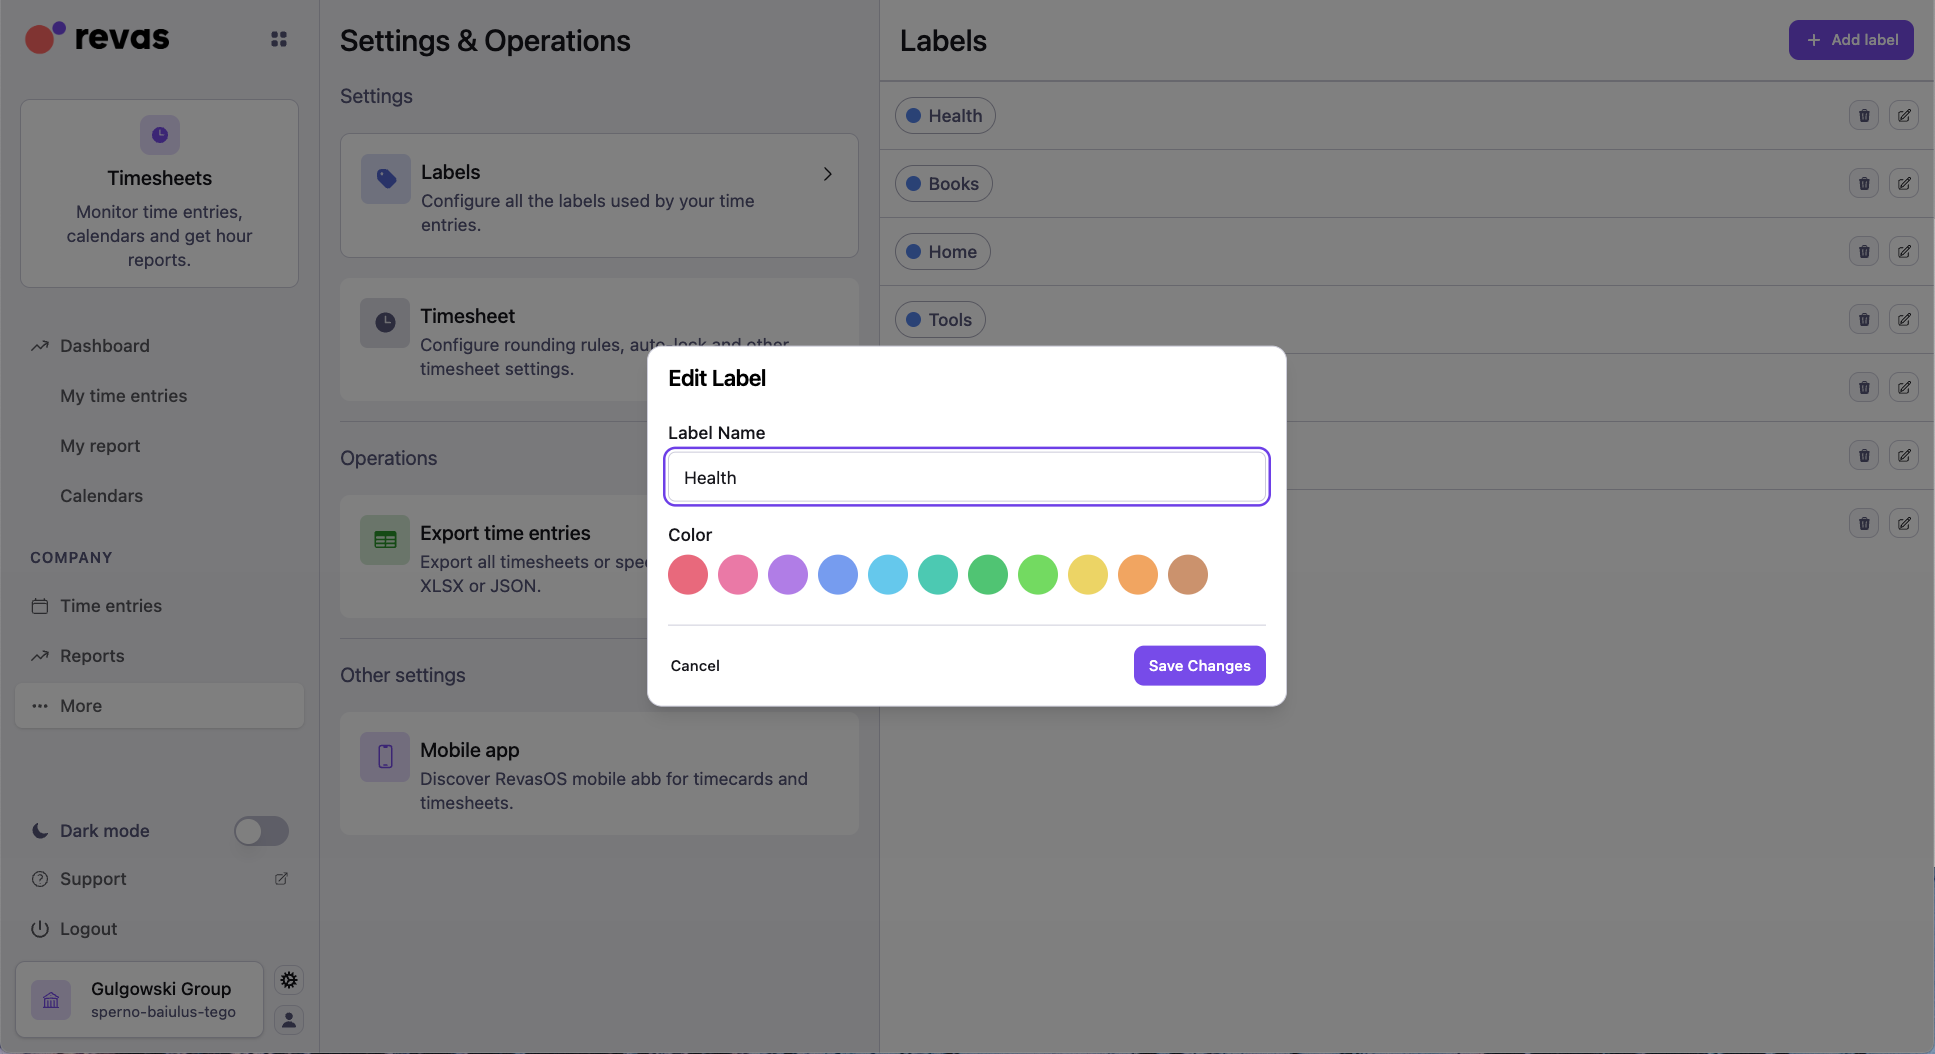
Labels
Create, edit, and delete color-coded labels for categorizing time entries. Each label has a name, a description, and one of 11 predefined colors. Employees select labels when creating or editing entries.
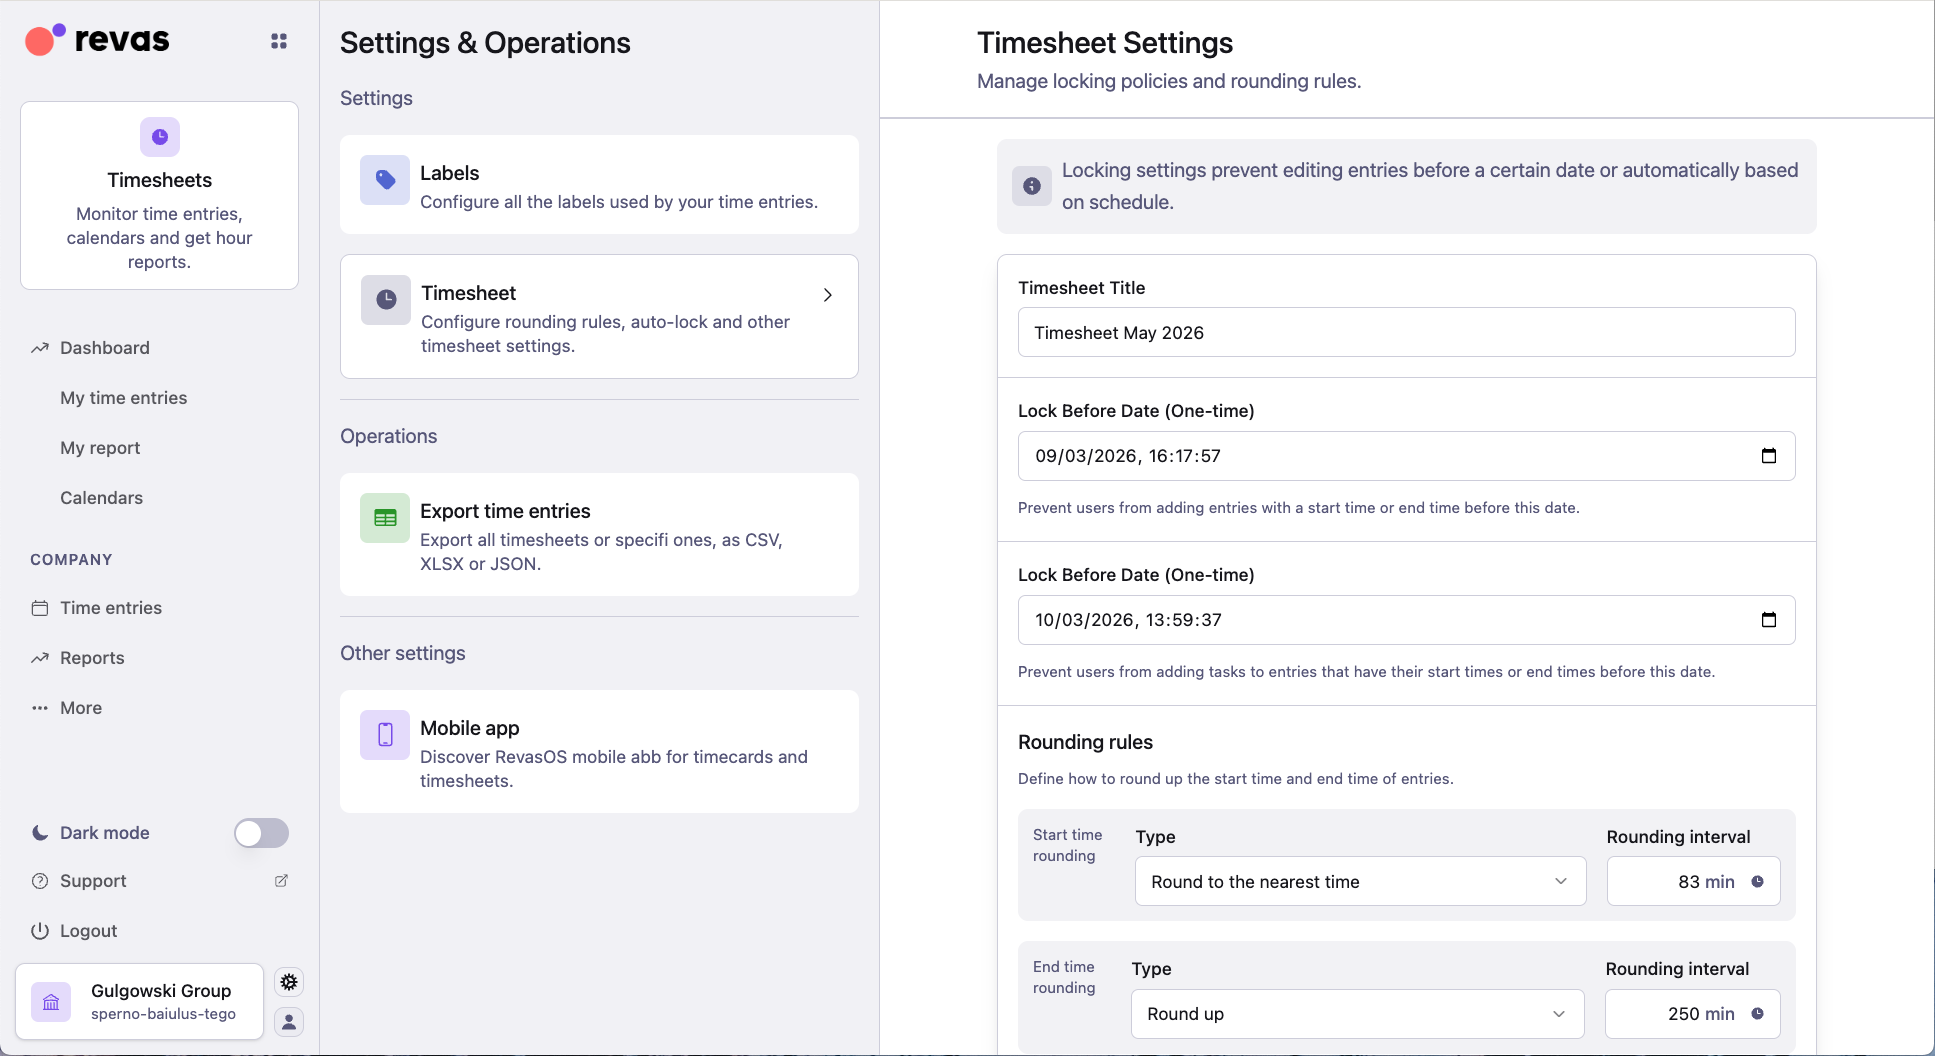
Time rounding rules
Configure organization-wide rounding for time entries:
- Start time rounding — round entry start times up or down to the nearest interval.
- End time rounding — round entry end times up or down.
- Interval — set the rounding granularity in minutes (for example, 15 minutes).
Auto-lock policies
Set up rules that automatically lock time entries after a defined period:
- Cron-based schedules — for example, lock the previous month's entries on the 5th of every month.
- Lock-before-time thresholds — prevent employees from editing entries older than a set number of days.
Workplaces
Define the physical work locations available in your organization. Employees select a workplace when logging a Presence entry.
Leave profiles
Configure leave types (vacation, sick leave, personal days, and others) with a working or non-working flag. Employees select a leave profile when logging an Absence entry.
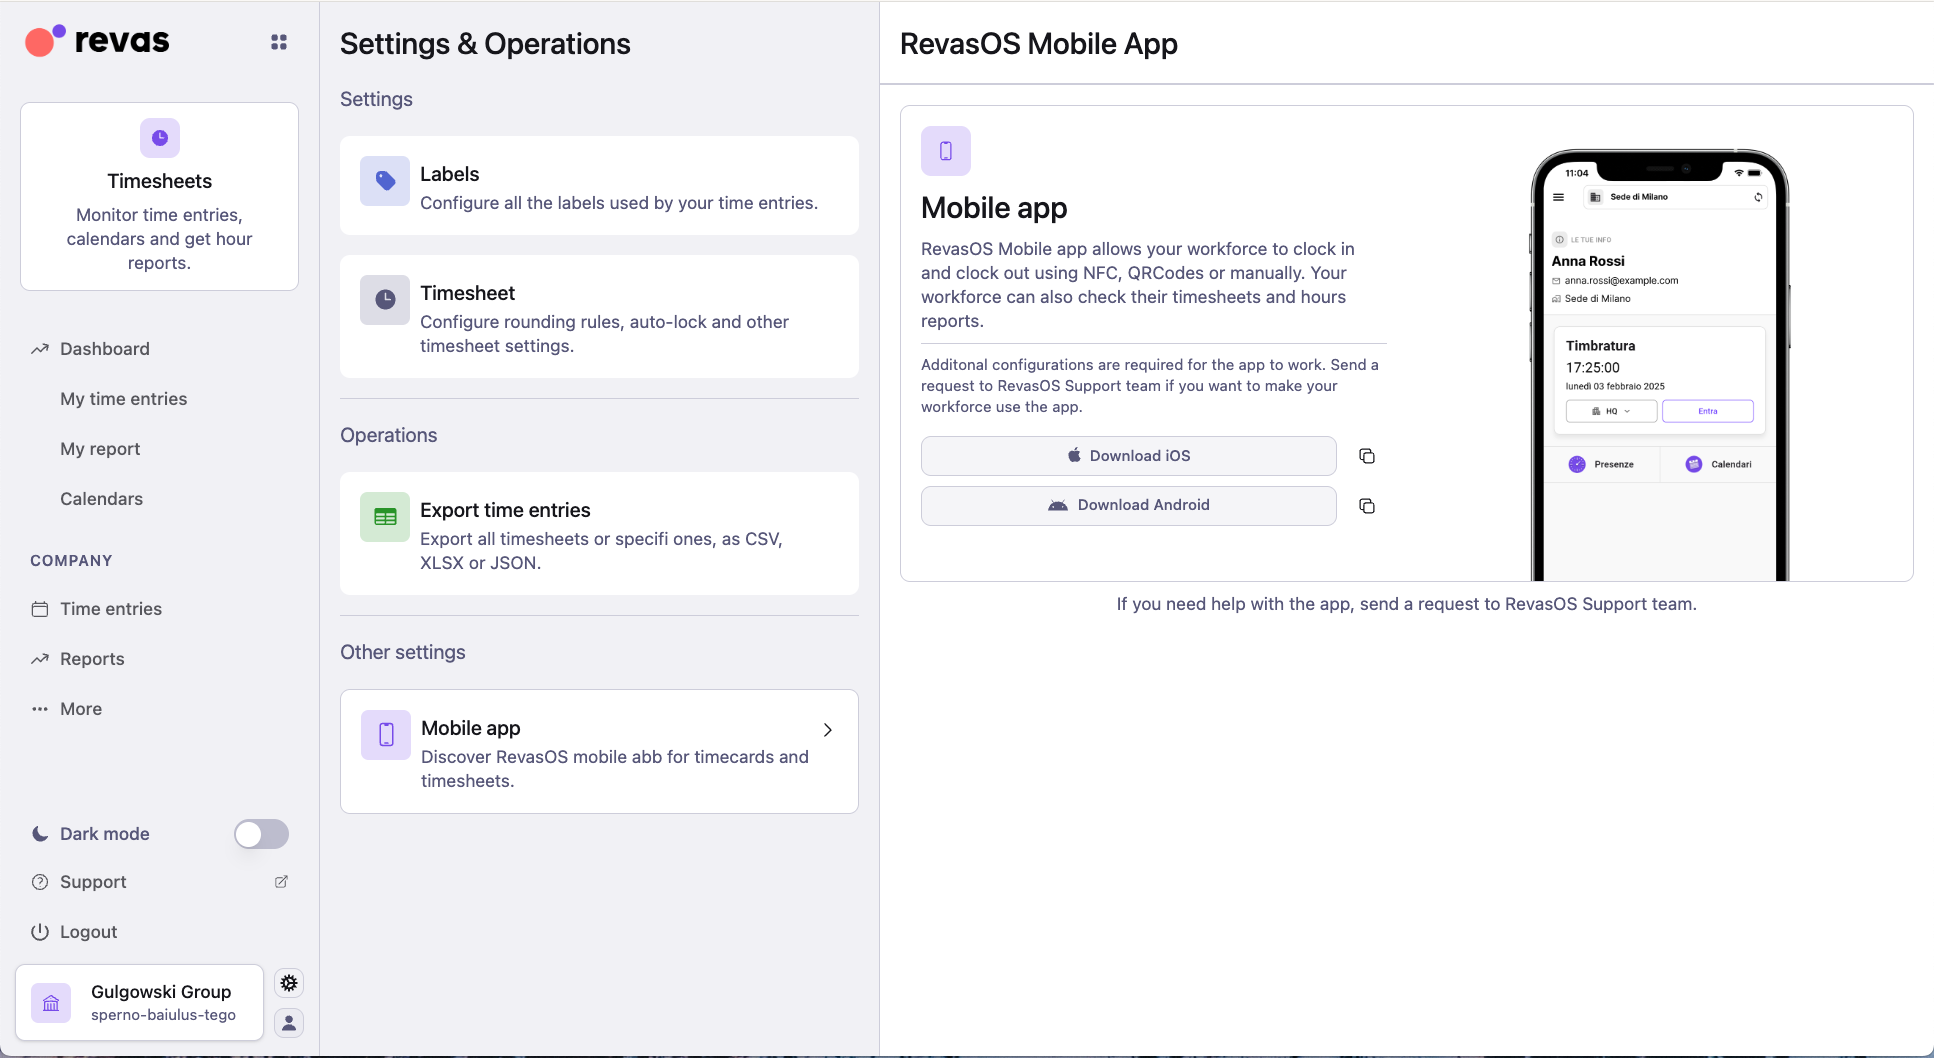
Mobile app
Find download links for the companion mobile app on iOS and Android, which supports NFC and QR code clock-in.
Data export
Configure and trigger exports of time entry data in CSV, Excel, or JSON format. Exports can be filtered by date range and contact and are delivered via email.